
Type C 5V 1A 18650 TP4056 Lithium Battery Charger Module Charging Board With Protection Dual Functions

| รหัสสินค้า | M0807-02 |
| หมวดหมู่ | บอร์ดชาร์ท/ควบคุม แบต/BMS |
| ราคา | 8.00 บาท |
| น้ำหนัก | 5 กรัม |
| สถานะสินค้า | พร้อมส่ง |
| ลงสินค้า | 29 ธ.ค. 2565 |
| อัพเดทล่าสุด | 23 ก.ย. 2567 |
| จำนวน | Unit |

รายละเอียดสินค้า
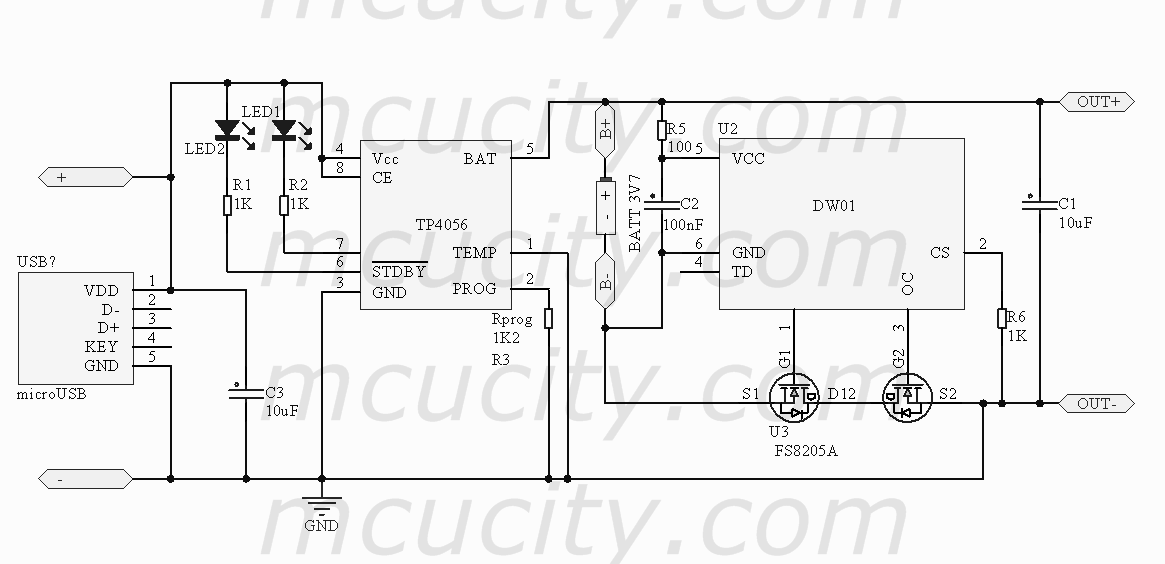
TP4056 - type-C USB 5V 1A Lithium Battery Charger with Protection
li-ion Battery Charger Board
โมดูลชาร์จแบตเตอรี่ลิเทียม กระแส 1000 mA (1A)
ใช้ชิฟ TP4056
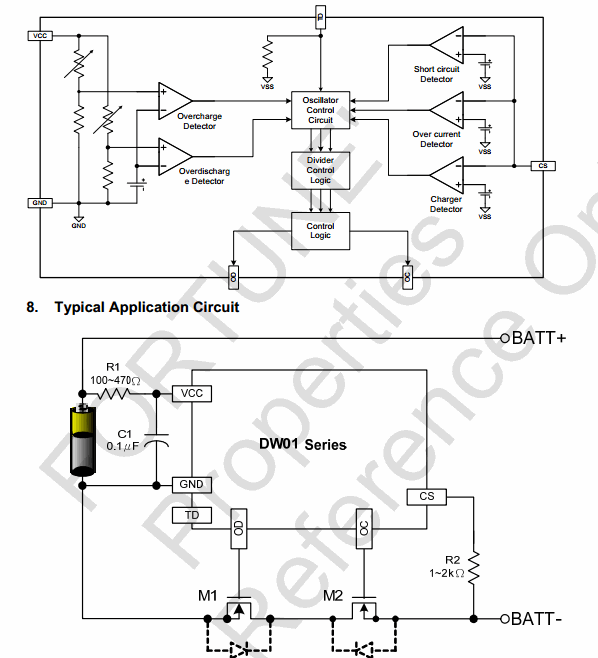
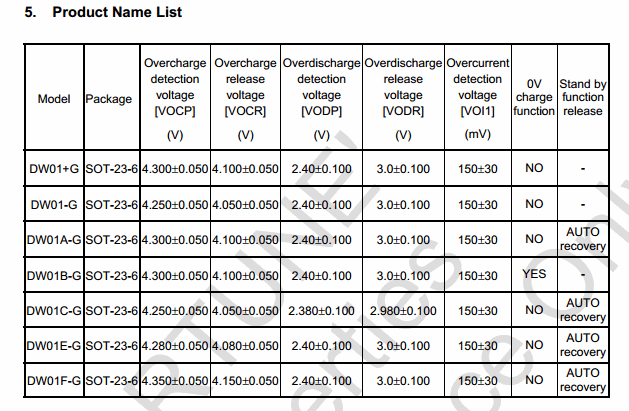
เพิ่มวงจรป้องกันแบตเตอรี่ลิเทียม โดยมีการป้องก้น 3 แบบ โดยใช้ CHIP DW01+ และ mosfet 8205A
1. Overcharge Protection
ป้องการชาร์จแรงดันเกิน 4.20-4.30 V
2. Overdischarge Protection
ป้องกันดิสชาร์จจนแรงดันต่ำกว่า 2.4-2.5V
3. OverCurrent Protection
ป้องกันการจ่ายกระแสเกินกว่า 3 A
DATASHEET TP4056
DATASHEET DW01+
DATASHEET FS8205A

This tiny module is perfect for charging single cell 3.7V 1 Ah or higher LiPo cells such as 16550s that don't have their own protection circuit.
Based around the TP4056 charger IC and DW01 battery protection IC this module will offer 1A charge current then cut off when finished.
Futhermore when the battery voltage drops below 2.4V the protection IC will switch the load off to protect the cell from running at too low of a voltage - and also protects against over-voltage and reverse polarity connection (it will usually destroy itself instead of the battery) however please check you have it connected correctly the first time.
Using the module
- Connect micro USB cable for power, or 5V DC to pads marked IN+ and IN- on left-hand side of the module
- Connect cell to charge to B+/B- pads on right-hand side of module
- A load (something for the battery to power) can be connected to the OUT+/OUT- pads on the right-hand side
- Important! Disconnect load when charging
- The red LED indicates chaging in progress, green LED indicates charging has finished.
- Never charge your battery at a rate greater than 1C.
Specifications
- Input voltage - 5V via microUSB or solder pads on left-hand side of module
- Full charge voltage - 4.2V
- Charging current - 1A by default. However you can change this by changing the 1k2 resistor next to the "IN-" pad the bottom-left of the board. See the Rprog table on page three of the TP4056 data sheet for different values and matching charging currents
- Input port with micro USB female, can directly use mobile charger for input to the lithium battery,and still retain the input voltage wiring solder joints, can be very convenient.
- Connect the battery to B + B - , insert mobile phone charger to the USB Female then red light is charging and green is full of charged.
- The input voltage: 5V
- Maximum charging current: 1000 mA
- Charge cut-off voltage: 4.2 V + / - 1%
- The battery overcharge protection voltage: 2.5 V
- Battery over-current protection current: 3 A
- Input interface: micro USB
- Size:2.6 x 1.7 cm
Package include:
1 x 5V 1A Micro USB 18650 Lithium Battery Charging Board Charger Module+Protection
Note
1. Ampere meter can only be connected to 5v input end of the module.
2. It is better that the charging current is 37% of the battery capacity. If you charge to the battery of 1000mAH, current of 400 is enough.
3. The connection wire should not be too thick.
4. Make sure the connect point is good.
5. If the input voltage is too high, like 5.2v, the current will be less than 1000mA, it is normal. It is protection function, auto-substract the charging current to avoid burn damage to chip.
6. NO Reveral polarity.
For the current self-regulation,the following table have proposed resistor value,the corresponding output and the current value
|
RPROG (k) |
IBAT (mA) |
|
30 |
50 |
|
20 |
70 |
|
10 |
130 |
|
5 |
250 |
|
4 |
300 |
|
3 |
400 |
|
2 |
580 |
|
1.66 |
690 |
|
1.5 |
780 |
|
1.33 |
900 |
|
1.2 |
1000 |
ote: The charge should disconnect the load OUT terminal on the positive and negative can not be wrong, please according to specifications, otherwise it will damage directly.
Module Features and parameters:
Inputs with MICRO USB female, can be directly input to do with the phone charger rechargeable lithium battery,
And still retains the input voltage wiring pads, can be very convenient DIY
Input voltage: 5V
Charging cut-off voltage: 4.2V ± 1%
Maximum charge current: 1000mA
Battery over-discharge protection voltage: 2.5V
Battery overcurrent protection current: 3A
Board size: 2.6 * 1.7CM
Instructions:
Note: The first time you access the battery, it may no voltage between the output OUT + and OUT-, then access 5V voltage charge your energy can activate the protection circuit, and the battery from the B + B-, then draw a line on the short open also need recharged to activate the protection circuit. Note that the charger must be able to output 1A or more to do when using a mobile phone charger input, or may not charge
+ MICRO USB female and next - pads for the power input, access 5V. B + positive then the lithium battery, B- then negative lithium batteries. OUT + and OUT- connected to the load, such as positive and negative electrodes connected mobile booster plate or other load.
Connect the battery to the B + B-, inserted into the USB female mobile phone charger, the red light is being charged, the green light to full.
เงื่อนไขอื่นๆ
Description
This tiny module is perfect for charging single cell 3.7V 1 Ah or higher LiPo cells such as 16550s that don't have their own protection circuit.
Based around the TP4056 charger IC and DW01 battery protection IC this module will offer 1A charge current then cut off when finished.
Futhermore when the battery voltage drops below 2.4V the protection IC will switch the load off to protect the cell from running at too low of a voltage - and also protects against over-voltage and reverse polarity connection (it will usually destroy itself instead of the battery) however please check you have it connected correctly the first time.
Using the module
- Connect Type-C USB cable for power, or 5V DC to pads marked IN+ and IN- on left-hand side of the module
- Connect cell to charge to B+/B- pads on right-hand side of module
- A load (something for the battery to power) can be connected to the OUT+/OUT- pads on the right-hand side
- Important! Disconnect load when charging
- The red LED indicates chaging in progress, green LED indicates charging has finished.
- Never charge your battery at a rate greater than 1C.
Specifications
- Input voltage - 5V via Type-C USB or solder pads on left-hand side of module
- Full charge voltage - 4.2V
- Charging current - 1A by default. However you can change this by changing the 1k2 resistor next to the "IN-" pad the bottom-left of the board. See the Rprog table on page three of the TP4056 data sheet for different values and matching charging currents
วิธีการชำระเงิน
ชำระเงินผ่านธนาคาร
ชำระเงินด้วยการ Scan QR


ชำระเงินออนไลน์
- ค่าธรรมเนียม 3.9% + 11 THB
- การชำระผ่าน PayPal คุณไม่จำเป็นต้องแจ้งชำระเงิน เนื่องจากระบบจะจัดการให้คุณทันที ที่คุณชำระเงินเสร็จสมบูรณ์
MEMBER
Join เป็นสมาชิกร้านค้า


- พิมพ์ “mcucity” ในช่อง Search
- หรือเข้าจากรายการร้านค้าโปรดของฉัน
