
KittenBot IOBIT V2.0 for micro:bit

รายละเอียดสินค้า
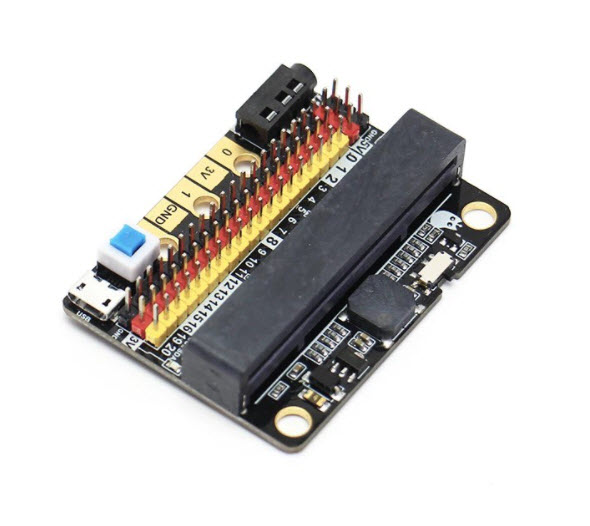
KittenBot IOBIT V2.0 for micro:bit
นี่คือบอร์ดส่วนขยายต้นทุนต่ำสำหรับ Micro: บิตซึ่งใช้สำหรับพอร์ต IO ของ Micro: บิตโดยเฉพาะ มันใช้ทรัพยากร IO ทั้งหมดบน Micro: บิตและยังมีออดบนบอร์ด มันเชื่อมต่อกับขา P0 ผ่านหมวกจัมเปอร์ สามารถปลดพิน P0 ได้โดยใช้หมวกจัมเปอร์ ขนาดเล็กเหมาะมากสำหรับโครงการขนาดเล็กที่ใช้ Micro: bit
ขนาดเล็กมากเหมาะสำหรับ DIY
พอร์ต IO ทั้งหมดถูกแตกออกมา
On-board buzzer คุณสามารถใช้โมดูลเพลงใน MakeCode เพื่อเล่นเพลงได้โดยตรง ในเวลาเดียวกันตัวเชื่อมต่อสัญญาณเสียงขนาด 3.5 มม. บนบอร์ดสามารถเชื่อมต่อกับอุปกรณ์เครื่องเสียงได้ เช่นหูฟังให้มีความพยายามที่สร้างสรรค์มากขึ้น
รูพินที่เข้ากันได้กับ LEGO สองตัวเพื่อการประกอบและการรวมที่ง่ายดาย
ส่วนต่อประสาน 3PIN นั้นโดดเด่นด้วยสีเหลืองสีแดงและสีดำ มันถูกสร้างขึ้นเพื่อให้เสียบในทางที่ผิดเป็นเรื่องยากและสะดวกในการเสียบเซ็นเซอร์
มันเลียนแบบนิ้วทอง 5PIN บน Micro: bit สะดวกสำหรับผู้ผลิตที่ต้องการใช้คลิปจระเข้
เมื่อเทียบกับ IObit1.0 ความแตกต่างที่ใหญ่ที่สุดคือสามารถอินพุตและเอาต์พุต 5V สนับสนุนการใช้เซ็นเซอร์ 5V และเพิ่มความจุของไดรฟ์ (สามารถขับเซอร์โวขนาดเล็ก 9 กรัมหลายตัว)
รวมฟิวส์การกู้คืนด้วยตนเอง 1A
มันสอดคล้องกับการเขียนโปรแกรม Micro: bit เนื่องจาก IObit ไม่มีชิปไดรฟ์ของตัวเอง (ยกเว้นออด) Building Block ที่ใช้โดยทั่วไปกับ IObit คือการใช้งานพอร์ต IO เซ็นเซอร์จำนวนมากในตลาดให้ผลตอบแทนสูงและต่ำ แบนหรือค่าแอนะล็อก สำหรับแอคชูเอเตอร์นั้นไมโครบิทต้องการเอาต์พุตในระดับสูงและต่ำเพื่อควบคุม ผู้ที่ไม่คุ้นเคยกับแง่มุมนี้สามารถค้นหา Netease Cloud Classroom: Xiaoyan Technology และค้นหา arduino tutorial ซึ่งอธิบายถึงวิธีการใช้เซ็นเซอร์ที่ใช้กันทั่วไปในตลาดหลักการก็เหมือนกัน
IObit, IO refers to (input, output), IObit as seen from the name is mainly to serve as pin outputs. It's suitable for some DIY enthusiasts hoping to use all of the IO ports.
Introduction :
This is a low-cost expansion board for Micro:bit, which is specifically used for the IO ports of Micro:bit. It has taken all the IO resources on the Micro:bit, and also has a buzzer on the board. It is connected to the P0 pin through the jumper cap. The P0 pin can be released using a jumper cap. The small size is very suitable for small projects using Micro:bit.
Features :
Small size, very suitable for DIY
All IO ports are extracted
On-board buzzer- you can directly use the music module in MakeCode to play music. At the same time, the 3.5mm audio connector on the board can be connected to audio equipment; such as, headphones to have more creative endeavors.
Two LEGO-compatible pin holes for easy assembly and integration
The 3PIN interface is distinguished by yellow, red, and black. It is created so that plugging it in the wrong way is difficult, and it is convenient to plug in the sensors.
It imitates the 5PIN gold fingers on the Micro:bit. This is convenient for makers who like to use the alligator clips.
Compared with IObit1.0, the biggest difference is that it can input and output 5V, support 5V sensor use, and increases the drive capacity (can drive multiple 9g small servos).
Includes 1A self-recovery fuse
Custom-designed silk screen board
Product parameters :
Length x width x height : 57mmx44mmx12mm
Technical parameters :
Power supply mode: IobitV.2.0 supports USB5V power supply. This power supply mode requires pressing the blue power switch.
Working voltage: 3V-5V (5V sensor module is not supported under 3V power supply)
Output current: 3V and 5V power interface with maximum output 1A
Serial port extraction: serial port can map IO port
I2C port leads: pins 19 and 20 can only be used as I2C function pins. They cannot be read and written as ordinary IO ports, because Micro:bit bottom is dead.
Spi port leads; 14, 15 (IO port can be read and written).
Specifics :
It is consistent with Micro:bit programming, because IObit does not have its own drive chip (except buzzer). The building block that is generally used with IObit is to operate the IO port. Many sensors on the market return a high and low voltage. Flat, or an analog value. For actuators, the microbit needs to output high and low level to control. People who are not familiar with this aspect can search Netease Cloud Classroom: Xiaoyan Technology and find the arduino tutorial, which explains how to use the commonly used sensors on the market, the principle is the same.
อุปกรณ์ภายในชุด :
- IObit 2.0 : 1
วิธีการชำระเงิน
ชำระเงินผ่านธนาคาร
ชำระเงินด้วยการ Scan QR


กิตติ แซ่เอี้ยว
096-xxxxxx-3
Accept All Banks | รับเงินได้จากทุกธนาคาร
ชำระเงินออนไลน์
- ค่าธรรมเนียม 3.9% + 11 THB
- การชำระผ่าน PayPal คุณไม่จำเป็นต้องแจ้งชำระเงิน เนื่องจากระบบจะจัดการให้คุณทันที ที่คุณชำระเงินเสร็จสมบูรณ์
MEMBER
Join เป็นสมาชิกร้านค้า
ร้านmcucity
/www.mcucity.com/
สมัครสมาชิกร้านนี้ เพื่อรับสิทธิพิเศษ


- พิมพ์ “mcucity” ในช่อง Search
- หรือเข้าจากรายการร้านค้าโปรดของฉัน
สินค้าในตะกร้า ({{total_num}} รายการ)

ขออภัย ขณะนี้ยังไม่มีสินค้าในตะกร้า
ราคาสินค้าทั้งหมด
฿ {{price_format(total_price)}}
- ฿ {{price_format(discount.price)}}
ราคาสินค้าทั้งหมด
{{total_quantity}} ชิ้น
฿ {{price_format(after_product_price)}}
ราคาไม่รวมค่าจัดส่ง
➜ เลือกซื้อสินค้าเพิ่ม